6 Top Benefits of Timber Floor Polishing


Nowadays, most homeowners prefer to use timber flooring instead of other types of flooring. Wooden flooring is comfortable, unique, and have warm features. Timber floor has proven to be timeless classic since it’s a style that does not go in and out of fashion. However, the shine and appearance of timber flooring changes as times go by due to constant use. The good thing about a wooden floor is that it can be polished to keep it shiny and attractive. Timber floor polishing Melbourne is the best method that can keep timber floors long-lasting and durable. Floor polishing is associated with a lot of benefits to homeowners. Here are some of the timber floor polishing benefits.


  • Add protection

When timber floor is polished, it is protected from scratching, wear, and tear. In fact, one of the benefits of sanding a wooden floor is for the purposefloor-polishing of protection. The polish applied on the timber floors adds a protective layer. Therefore, the polish is usually a barrier between the floor and the wooden floor and as such the chances of getting damaged and scratched are minimized.

  • Improved appearance

When wooden floors are cleaned with chemicals, they get scratches and fade. In case your wooden floor has stains, scratches, and has faded, wood floor polishing is the ideal solution to restore its appearance to make it have a fresh look and feel. Sanding makes the timber floor appear smoother and newer. This is because the first layer is scraped off and a new layer is brought forth. The layer brought forth soaks up all sorts of stains and look fresh.

  • The entire room is freshened

The lighting in the entire room is improved. Thus light gets spread in floor-sanders
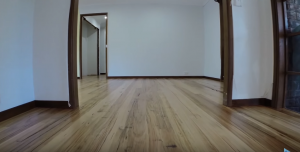
the right manner, and at the same time, the ambiance of your room improves. When the ambiance of the rooms is improved, the house will feel different and more comfortable.

  • Ideal for allergy sufferers

Timber floor sanding is a great solution for the health of people who suffer from allergy. Carpets are known to harbor dust and allergens that can wreak havoc on allergy sufferers. When a floor is polished, it is easy to get rid of dust and allergens thus polishing is good for allergy sufferers.

  • It gets simpler to clean the floor

floor-sanding-and-polishingPolished floors have decreased resistance to movement. When the floor is polished, it becomes hard for dust particles to collect on the floor since the flooring remains leveled. As such, you will not need to clean the floor frequently since a polished floor remains cleaner for a longer period. Polishing a floor improves the level of safety as it pursues floor fixing thus making it simpler to clean.

  • Easy to customize the room to your tastes

Floor polishing allows you to customize your rooms to suit your specific tastes. For instance, you can match the color of the floor to that of the furniture. Also, you can choose a color that will brighten up the entire room. You can choose different colors that match your tastes when it comes to staining.

How to Safely Remove a Garage Door


If you are planning on performing a garage door installation, you will have to start by taking your old garage door down. This is a job you can do without professional help, though it is a good idea to have at least a couple of people working on it together because garage doors are so heavy. Remember, you’ll want to leave your old garage door up until you are ready to install the new one so that your garage will be protected at all times.


Remove the Tension Springs

The tension springs are what make it possible for you to open and close your garage door without a problem. As per Garry from www.garageoverheaddoorsokc.com This is also the most dangerous part of removing a garage door, since if it snaps loose, it could cause serious injury. To avoid this, start out with the garage door in the open position, which will relieve most of the tension on the spring. Next, lock the door in place using a clamp on the garage door wheels to ensure it does not accidently fall. Finally, find the screws at the end of the tension spring, and remove them.

overhead-door

Removing the Hardware

Now that the tension spring is down, there is nothing that is holding the garage door in the open position except the clamp you put on. You will need to remove the clamp to allow the garage door to go to the open position so it can be removed. Have at least one or two people holding the garage door in place when you remove the clamp. Once removed, allow the door to slide down carefully. Once down, you will see the centre brace along the tracks. This brace will have a pin in it, which holds it in place. Remove this pin with a pair of pliers. This will allow you to take down the top hinges and rollers.


Remove the Garage Door

You can now begin removing the garage door, section by section. Starting with the upper part of the door, simply lift it out along the tracks. Each chapter will still be heavy so lift it carefully and set it aside. Once the garage door is removed, go through and remove any other hardware that you will not be reusing, such as the tracks and centre brace.

garage-door

Now that the door is down, you can begin your new garage door installation. Make sure all of the parts of the old garage door are out of the way so you do not get them mixed in with the new door parts.

Garage doors have revolutionised a lot, from the simple up and over garage doors from the 19th century to the modern mortar powered garage doors. The mortar powered doors come with additional security because they can lift heavy reinforced metal doors with just a click of a button. This is unlike the outdated garage doors which were restricted to reinforcement because map power was required to push it up or push it open. This article targets homeowners and explains the process on how to turn a manual sectional garage door into an automated retractable garage door.

Carpet Cleaning Methods: Encapsulation


Carpet cleaning is a burden on most people especially if the available vacuum cleaners cannot remove deep embedded dirt particles. Encapsulation is a very effective method that dry cleaning services have adopted and is slowly increasing on demand. This article focuses on homeowners to enlighten them on how this cleaning technique is used to clean carpets.

Encapsulation is a polymer-based formula that is used on floors and carpets to eliminate dirt. It crystallizes oils, soil particles, old residues and grime. It is applied on the carpet using a brush applicator, compression sprayer or a rotary machine. When in contact with the carpet, it mixes with dirt to form crystals. After drying, the carpet is then vacuumed to remove the formed particles.

A common test to verify a good encapsulating solution is to pour a drop or two into a bowl and leave it to dry for a few hours. If it forms into a crystal that easily detaches itself from the bowl, then that is a good encapsulating solution. If it forms a sticky substance or does not seem to look dry, that does not qualify for good carpet cleaning reagent.

Before beginning, it is important to have the necessary equipment which include; vacuum, carpet bonnet, a mob bucket, carpet cleaning solution, trigger sprayer, hazard signs, carpet mob and a putty knife. Here are some benefits associated with Encapsulation.

carpet-cleaning

Benefits of Encapsulation

It is fast

As per www.carpetcleaningpompanobeach.net It a fast-cleaning procedure and does not require long periods to dry, instead, the carpets take a maximum of twenty minutes, and they can be used. This is advantageous for high population-flow premises such as banks, hotels and hospitals.

Little water required

Since crystallization requires evaporation, a little water is needed to clean the premises. This reduces the chances that the dirt will reappear as mud. Little water usage also prolongs the life of the carpet because the carpet is not in frequent contact with washing solutions.

Alternative mode of cleaning

It has offered cleaners a new choice in cleaning apart from steam cleaning and hot water cleaning which involves exposing the carpets to steam and hot water respectively and vacuuming them. Other methods of cleaning involve the use of detergents and soaps.

Perfection: Encapsulation is capable of removing stubborn stains that withstands other detergents. It also eliminates wicking of carpets (this is when water and cleaning solution moves upwards when drying leaving dirt stains). Its crystalizing nature also ensures that no dirt is left in the carpet because all dirt comes together and forms a crystal. If the crystals break, they form small crystals that are still able to be pulled out using a vacuum cleaner.

To keep your carpet smelling great and feeling clean, freshen it up once in a while with carpet cleaning powder. Simple sprinkle and refreshing results. There’s nothing that says ‘good housekeeping’ quite like a clean carpet! A good deal of the powder of carpeted areas, then leave it to work for a few hours – the longer the better. Then vacuum the carpet for instantly.


Wood Carving Tips


Wood carving is an artwork, which is normally done as a hobby, or full time job, all focusing to express the creativity of craftsmen. Since historical times, human beings carved utensils, instruments, tools, and other items from wood. Today, several items like ornaments, toys, sculptures, decorations, figurines, and many more can be carved from wood. Indeed, it is an activity that started many years ago, but has been embraced by a large portion of population even today. Most craftsmen prefer to use wood because it is malleable, and also can be carved easily.


Choosing the Right Wood for Carving


The type of wood that you select would have the final bearing of the object you carve. The stronger part of the wood is the grain, and when you work around this part, you will get more brittle results. Before you decide where to start carving, you should prepare the most intricate pieces, which you will be using.

When carving an item with very tiny or detailed pieces, it is advisable to use hardwoods, since they are sturdy even after being carved to tiny degrees. In this case, some common wood that wood deliver the results you need include sycamore, apple, plum, Italian walnut and pear.


For any other wood carving which does not require fine pieces, you can use wood from mahogany, chestnut, American walnut, basswood, teak and Tupelo. These are the most popular types of hardwoods that are easy to work with. Softwoods can be carved easily, but they are lack longevity like that of hardwoods.

wood-carving

Starting you Wood Carving Work


After selecting the type of wood to use, you should start by sketching the item you want to carve. This can be done on both sides of your piece, the front and the back. The sketch would help you to shape the object you’re about to carve. Some woodcarvers use photographs, while others rely on their memory to carve.


You should have all relevant wood carving tools that you may need in this work. The artistic impression of what you want to carve, and the wood you want to use would largely determine the types of tools to use. Use the right carving tool for the right purpose to avoid damaging your object. Tools like chisels, gouges, rasp, files, cutters, engravers, carving knives and sanders are commonly used for carving.


Painting your Wood Carving


You will need things like paintbrushes, paints, sandpaper, sealant, pencil and towel to complete the carving. You need to smoothen the carving using sandpaper, and remove all loose pieces using a towel. Using a pencil, you can sketch areas that you need to paint using different colors. Painting the wood carving is meant to give it beautiful appearance and outlook. Also, it gives the carving the natural appearance, as most of them are painted using their respective natural colors. Sealant would be the last thing to apply on your wood carving in order to prevent warping of the wood, and flaking of the paint.